So I'm a day late with this post...but I've been sick, so I know that all will be forgiven :)
We're showing you our favorite Christmas-y projects all month at True XOXO, and yesterday, an old favorite of mine was featured. You all know how much I love repurposing items, so the fact I turned a clementine box into a gift box should come as no surprise.
Check out the XOXO post here to see what I did and link up your own project, and for details on how I did it, head to this old post here. (It is the third project included in the post.)
I am off to clean up my craft area. It's going to snow this afternoon, so that's where I'll be found! I miss that desk of mine...I hate being sick!
xoxo
Khristen
Saturday, December 29, 2012
Friday, December 21, 2012
Drowning in Holiday Chaos
Yes, I know it's been some time since my last post. If you recall, I have been making ornaments to sell, and they are a popular item! So much so, it's all I've been doing for the past few weeks! Here are some of the ornaments I've made so far (I am working on the last three right now!):


 Glad these will be complete this afternoon. Then I can focus on prepping for Christmas!
Speaking of Christmas, I haven't been able to get all of my holiday cards done just yet, but I'm close! I have been operating on supersonic speed mode, so there aren't many pics of my cards. However, here's one I thought I'd share, it's one of my favorites! I made it yesterday, and it is made using the Scraptastic Club's Stocking Stuffer card kit. I love this kit, and even after making a ton of cards, I still have plenty left over for those holiday layouts that I dream of being able to complete. (I haven't done any scrapbooking in AGES! I miss it so much!)


 I'd love to share more, but my homemade rub-on transfers for the last three ornaments are ready :) Back to work I go! If I am not able to post again prior to Christmas, I want to wish you all a merry Christmas! May the new year be the best year yet for you and your families!
xoxo
Khristen


Speaking of Christmas, I haven't been able to get all of my holiday cards done just yet, but I'm close! I have been operating on supersonic speed mode, so there aren't many pics of my cards. However, here's one I thought I'd share, it's one of my favorites! I made it yesterday, and it is made using the Scraptastic Club's Stocking Stuffer card kit. I love this kit, and even after making a ton of cards, I still have plenty left over for those holiday layouts that I dream of being able to complete. (I haven't done any scrapbooking in AGES! I miss it so much!)


xoxo
Khristen
Monday, December 10, 2012
Monday = Crafter's Companion Post Day!
I need to remind myself of this on my calendar I think...I almost completely forgot to post at Crafter's Companion this week! Monday is my day, and the stress of these ornaments I've been making has gotten the better of me. For those who don't know, I have a friend who wanted an ornament she saw on the internet but didn't know who made it or where to buy one. So, of course I had to chime in with my two cents: "Oh, that's easy to recreate." After offering to show her how, she just asked me to make one and come up with a price...which led to a couple of people also requesting I make them some (you know how Facebook works!) which then led to the flood of orders I almost drowned underneath!
So...after three days of trying to figure out the best way to get the sentiment recreated, I settled on having a shop that normally does vinyl create a digital file I could use anyway I saw fit. Because the ornaments were so small, the intricate fonts wouldn't cut well, and would end up costing me an arm and a leg. Here's the original ornament my friend had posted on her Facebook wall:
 Isn't it pretty? She's a graphic designer and loved the sentiment exactly as-is. Something about a nice blend of fonts...so nice. Anywho, I took the digital file that was created (it doesn't look exactly like those pictured above, but it's close) and tried my hand at homemade rubons. I don't know if you've ever seen tutorials out there for this process, but let me share with you: the hairspray trick only works with decent hairspray (think Aqua Net). Of course, I'm fresh out of Aqua Net...and my hairspray just wasn't working. You're *supposed* to spray the transparency with hairspray, print the sentiment, let it dry, and spray it again...well, this just doesn't work on a circular glass ball. The hairspray seemed to just seal the sentiment to the ornament, and when I did get a bit of transfer, it would smear all over the place. Just when I thought I had to refund all of the orders I had taken, I had an epiphany: spray adhesive! I printed the sentiment on transparency WITHOUT any adhesive on it. After about 15 minutes of drying time, I sprayed a super-thin layer of adhesive over the sheet. I let that dry for another 20 minutes, and applied the sentiment to the surface of the ornament one line at a time. And what do you know, it WORKED! Here's the finished product, my first order out the door:
 Do you like my knock-offs? Of course, it isn't exactly the same.. The flower is different (Recollections), and I used Liquid Pearls in the center of the flowers. Other than that, they're pretty much the same! I think the shop that did my sentiment, RightSide Stuff, did a wonderful job. Amy, the shop owner, is such a sweetie, and she was quick to whip one up (which was much appreciated!) Thanks, Amy!
Some have requested other ribbon colors, and I'll be getting to those later...first, I wanted to make sure you head over to Crafter's Companion Info Blog to see my post for the day. It is a Christmas card using the Love, Joy, Peace stamp (which is a holiday favorite, for sure!) I love stamps that are intricate and great for coloring, but I also love those stamps that don't require coloring every once in a while. Here's a sneak peek (but I'm going to make you go to the blog to see it all!) You'll want to, as the giveaway we're having ends tonight at 6PM EST...info is all in my post, so head over and see how to enter to win a Strawberry Kisses - Party Girl stamp set!
Sneak peek of my project:

I'm out of here for now, with articles to write and more ornaments to push out. I'm hoping to get all orders I have out there completed today! Ambitious? Yes, probably. But I think I can do it!
Have a great day,
xoxo
Khristen
So...after three days of trying to figure out the best way to get the sentiment recreated, I settled on having a shop that normally does vinyl create a digital file I could use anyway I saw fit. Because the ornaments were so small, the intricate fonts wouldn't cut well, and would end up costing me an arm and a leg. Here's the original ornament my friend had posted on her Facebook wall:

Some have requested other ribbon colors, and I'll be getting to those later...first, I wanted to make sure you head over to Crafter's Companion Info Blog to see my post for the day. It is a Christmas card using the Love, Joy, Peace stamp (which is a holiday favorite, for sure!) I love stamps that are intricate and great for coloring, but I also love those stamps that don't require coloring every once in a while. Here's a sneak peek (but I'm going to make you go to the blog to see it all!) You'll want to, as the giveaway we're having ends tonight at 6PM EST...info is all in my post, so head over and see how to enter to win a Strawberry Kisses - Party Girl stamp set!
Sneak peek of my project:

I'm out of here for now, with articles to write and more ornaments to push out. I'm hoping to get all orders I have out there completed today! Ambitious? Yes, probably. But I think I can do it!
Have a great day,
xoxo
Khristen
Wednesday, December 5, 2012
XOXO December, Baby! Day 5 AND a GIVEAWAY!
We are having so much fun this month over at the True XOXO blog! Every day, we are featuring our favorite Christmas projects. Head over and check out the past 4 days of projects after feasting your eyes on my project, featured today!
You might remember this from last year if you are a follower of my blog. I have a hard time throwing away packaging, and my iPhone box was no different. I knew I could make a pretty gift box out of it, so I hit the craft room and got to work!


 Isn't he just the cutest little baby elephant? One of my favorites.
I hope you love my project! See how easy it is to make a box your own? Don't forget to head over to the XOXO blog and see the other pretty things the rest of the team is making, and link up your own Christmas-y project!
And...in the spirit of Christmas, I'm giving some things away!! I will return to post the picture later, but I'm de-stashing (and there's an adorable Hello Kitty Sizzix die in the mix!) Leave a comment on this post and tell me which project is your favorite so far over at the XOXO blog. I will choose a winner on the Jan 1, 2013 (which I can't believe is around the corner!)
You might remember this from last year if you are a follower of my blog. I have a hard time throwing away packaging, and my iPhone box was no different. I knew I could make a pretty gift box out of it, so I hit the craft room and got to work!

Bo Bunny papers, which I measured and cut to fit the top/sides/bottom/inside of the box. MM trim. Random red twine from my stash. Bo Bunny brad. Crafter's Companion Humphrey stamp and sentiment colored with my Spectrum Noir markers. Glitter for the snow and on the hat.


I hope you love my project! See how easy it is to make a box your own? Don't forget to head over to the XOXO blog and see the other pretty things the rest of the team is making, and link up your own Christmas-y project!
And...in the spirit of Christmas, I'm giving some things away!! I will return to post the picture later, but I'm de-stashing (and there's an adorable Hello Kitty Sizzix die in the mix!) Leave a comment on this post and tell me which project is your favorite so far over at the XOXO blog. I will choose a winner on the Jan 1, 2013 (which I can't believe is around the corner!)
Friday, November 16, 2012
XOXO Challenge #36: The Stashiest Challenge!
Stashiest? Yes. I said that. And if you're saying "HEY! You already posted an XOXO challenge for the month!" Yes, I did, but we are going to start posting a SECOND layout to inspire you from now on. Yay!
So back to my awesome made up word: this time we want to see how you use your old supplies, a.k.a. stash. We all have one, and if you've been doing this for a long time, well...your stash is probably suffocating you (I know mine is!) That's why I loved this challenge! When you start using kits and collection packs, you have everything you need right there. Everything matches, and it becomes super easy to throw a layout together in record time. However, what about all of the other stuff you have? Show us a layout that uses up your stash for a chance to be a guest designer (which you totally want, because we are totally awesome and fun to hang out with in our super-secret Facebook group!)
*drum roll* Here is mine, a long overdue picture-less layout for Patryk's album recording his stats at 9 months old:
 I started with this fun Sassafrass Apple Jack paper that I've had for over a year. All the patterned papers come from this collection, as well as the journal box. From there, I added quite a bit of randomness from every single square inch of my stash.
 The star strip came from the paper itself, cut away from the bottom, and above it I adhered a piece of Colorbok printed twill (3 years old). I thought the rub on, a DCWV doodle from about 4 years ago, was a good addition.
 The title is small, printed with my Dymo label writer I have had since the late 90's, on red tape.
 I had painted up this Stuff2Scrap chipboard with red acrylic paint over a year ago, but decided it didn't fit with the layout I had intended it for. It's been sitting on my desk ever since, and I figured it was time to use it! Above it is a Christy Tomlinson She Art rubon I bought a year ago but hadn't used yet.
 On the Sassafrass journal spot I used a combination of Jillibean (the numbers), Stickabilities (Scrabble tile stickers from around 2000), and Cosmo Cricket alphas, as well as some MME tickets leftovers from a kit purchased last year.
 If you remember Magic Mesh, you've been scrapping a long time...and I have a lot of it. Here is some red Magic Mesh (surprisingly still sticky after 11 years!) and some Magic Scraps Coastal Netting adhered with Recollections brads (and the netting is just as old as the Magic Mesh!) The saying is from a DCWV vellum quote stack and the "bigger" sticker is from American Traditional Designs (now Momenta.) It might be hard to see, but there are more DCWV doodle rub ons, stars, on top of the mesh. The saying is stapled to the page, and random staples are added to the Coastal Netting.
 MM Charmed Enamel for the blue circle, Recollections yellow brad, and a metal hangar I've had for a long time.
 Don't you just love that coastal netting?
 The checklist is an MME The Sweetest Thing die cut, another kit leftover, and the rub on is another She Art beauty. They are both on top of a Rusty Pickle (another awesome manufacturer from back in the day) file folder, also featuring staples.
 The word "treasure" is a 7 Gypsies rub on.
Do you like it? I love picture-less layouts as they really allow you to get creative with your stash, as well as use up a lot of it! Do you do picture-less layouts? Will you try them now that you see how fun they are?
Head over to True XOXO to see what the other awesome designers have come up with, and don't forget to play along for your chance to guest design for us!
xoxo
Khristen
So back to my awesome made up word: this time we want to see how you use your old supplies, a.k.a. stash. We all have one, and if you've been doing this for a long time, well...your stash is probably suffocating you (I know mine is!) That's why I loved this challenge! When you start using kits and collection packs, you have everything you need right there. Everything matches, and it becomes super easy to throw a layout together in record time. However, what about all of the other stuff you have? Show us a layout that uses up your stash for a chance to be a guest designer (which you totally want, because we are totally awesome and fun to hang out with in our super-secret Facebook group!)
*drum roll* Here is mine, a long overdue picture-less layout for Patryk's album recording his stats at 9 months old:


Do you like it? I love picture-less layouts as they really allow you to get creative with your stash, as well as use up a lot of it! Do you do picture-less layouts? Will you try them now that you see how fun they are?
Head over to True XOXO to see what the other awesome designers have come up with, and don't forget to play along for your chance to guest design for us!
xoxo
Khristen
DVC#45: Anything Goes!
Good morning, I hope your week has gone well. I am pleased to say that I am prepared to host Thanksgiving, and done shopping for two of the kids' birthdays, both occuring the week after Thanksgiving. Yay me! Now I can focus on Christmas!
Anyway, it's time for another Dream Valley Challenge. Anything goes for this one, just make something and link it up for your chance at winning a gift certificate for £10.00 to:


Anyway, it's time for another Dream Valley Challenge. Anything goes for this one, just make something and link it up for your chance at winning a gift certificate for £10.00 to:
The design team really rocked it this time around, be sure to head over to Dream Valley Challenges and see what they've all done for this challenge.
Here's what I did, of course a Christmas card (because I am trying to get it all done ahead of time this year, so unlike me, a procrastinator at heart.)

I just love this Humphrey stamp from Crafter's Companion! Colored her up with my Spectrum Noir markers to match the fun Bella Blvd. Merry & Bright papers. I thought the sentiment would be nice as a big banner across the top, and both the banner and the image are mounted with adhesive squares for dimension.
Don't forget to play along for your chance at the prize by linking up to this post.
Have a great day!
xoxo
Khristen
Wednesday, November 7, 2012
A great way to start the day...
...is with this post! I hope you are all enjoying the week thus far. After a half day of school for the kids Monday followed by having Tuesday off, I was quite ready for them to go back today! For some reason, the school takes these days and devotes them to parent teacher conferences. But let's think about this: first, we had two days off for Hurricane Sandy at the beginning of the month, then yesterday for P/T conferences, the kids get next Monday off for Veterans' Day, then three days the following week for Thanksgiving....do kids every attend school anymore? I don't remember getting all of these days off when I was a kid! That's what made the snow day so wonderful (which I fear we'll be getting a lot of this year, so I predict we are in school well into June. Ugh.)
So today, after completing a couple of writing assignments, I will be planting my butt at the craft table! I have made a large amount of Christmas cards for my own friends and family, so I think it's time to make some things for the shop and craft fairs! Boxed Christmas cards, potty charts, gift albums...I am quite motivated and inspired to do all of these things. The housework can wait, inspiration is fleeting!
Here are a few cards I would like to share with you, all made a few days ago.
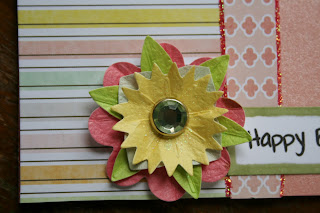
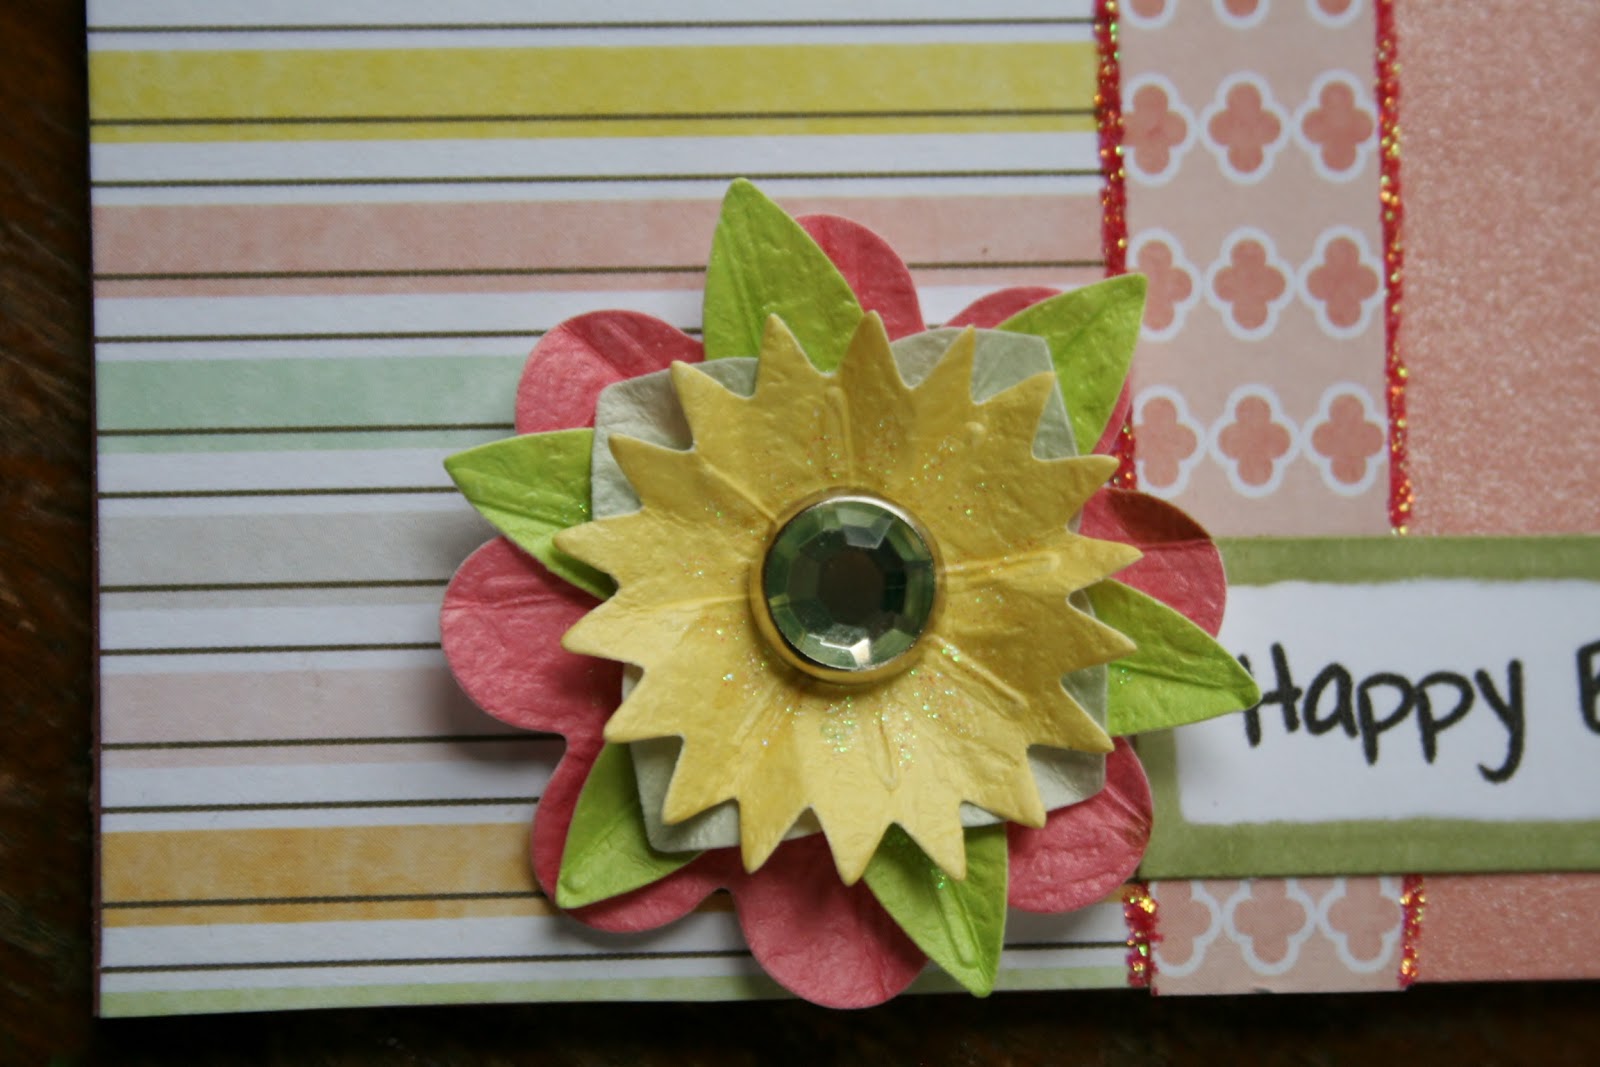
I have been trying to use up my stash to make room for next year's crafty goodness (can you say "giveaway" soon? Yeah, I'll be giving a lot of it away so stay tuned!) This card features AC Dear Lizzy Neapolitan on a pearlescent paper from Crafter's Companion. The sentiment is Birthday Wishes from the new Mulberry Woods Everyday line. I took some AC Beach house paper flowers, stacked them up, and held them together with an AC jewel brad. Fruit Punch Stickles and Spectrum Noir marker for the edge around the banner were just what I needed to finish this off!


 This one was kind of fun. I have had this image printed out ready to color for quite some time, Stamp It Australia - Feather Script. After coloring it up with my Spectrum Noir pens, I covered a base in homemade mist made with Flamingo Pearl Ex powder, water, and a touch of water based glue to hold it on the paper. Love the subtle shimmer! Used some Echo Park Playful to mount the image, and an assortment of washis behind the mat. That's it! Let the image do the talking on this one :) The sentiment is Toreads - Sky. It was a little too plain for my tastes, so I added some Fruit Punch and Patina Stickles.


 More pearlescent paper from Crafter's Companion, along with two Stamp It Australia stamps from the holiday collection: Love, Joy, Peace and Tree Whirl. Lily Bee Merry & Bright Paper, ruffled ribbon from Reasonable Ribbon, some Tim Holtz distress ink along with AC Cranberry ink to recreate that awesome burgandy color, and silver Liquid Pearls to compliment the card base.


 A nice non-traditional Christmas card using MME Miss Caroline wood plank paper. I love this color combo so much! Paintbox Poppets - Winter Pastime image and sentiment, colored with Spectrum Noir pens. The mat was inked up with SEI chalk box ink. MME twine behind the sentiment, which is affixed with foam squares for dimension.
 Finally, I colored up this cute Humphrey stamp and paired it with Carta Bella Merry & Bright paper (my new favorite color combination for Christmas! So bright and fun!) Both the image and banner with sentiment are adhered with foam squares.
 Ok, there they are! Hope you like them, now I'm off to make fun cards for the shop. Watch for them later on.
xoxo
Khristen
So today, after completing a couple of writing assignments, I will be planting my butt at the craft table! I have made a large amount of Christmas cards for my own friends and family, so I think it's time to make some things for the shop and craft fairs! Boxed Christmas cards, potty charts, gift albums...I am quite motivated and inspired to do all of these things. The housework can wait, inspiration is fleeting!
Here are a few cards I would like to share with you, all made a few days ago.
I have been trying to use up my stash to make room for next year's crafty goodness (can you say "giveaway" soon? Yeah, I'll be giving a lot of it away so stay tuned!) This card features AC Dear Lizzy Neapolitan on a pearlescent paper from Crafter's Companion. The sentiment is Birthday Wishes from the new Mulberry Woods Everyday line. I took some AC Beach house paper flowers, stacked them up, and held them together with an AC jewel brad. Fruit Punch Stickles and Spectrum Noir marker for the edge around the banner were just what I needed to finish this off!


xoxo
Khristen
Friday, November 2, 2012
XOXO #35: Timeline Challenge!
Good morning! An early post for your reading pleasure...
It's time for another XOXO challenge, and this month we were asked to not only follow a sketch...

 I pulled from my Scraptastic Hall Pass kit once again, love the Studio Calico Yearbook line! Added a piece of crochet ribbon under the patterned paper for some fun.
 In keeping with the little "About Me" box on Facebook under the profile picture, I chose this little file folder sticker in the kit. To mirror the different lines of text in that section on Facebook, I put the file folder tab stickers to work, finishing it off with some twine around the edge of the file folder. See that little Elle's Studio banner? LOVE these little guys!
 Just like the boxes on Timeline, you know, "Photos" "Likes" "Apps" etc...I thought I would separate the words out under the pictures (which are, in fact, some of my faves from our vacation that year.)


It's time for another XOXO challenge, and this month we were asked to not only follow a sketch...
...we were asked to use Facebook's new Timeline layout as inspiration. The sketch screams Timeline, doesn't it? Whether you love it or hate it, Timeline inspires some pretty rockstar layouts. Just head over to the XOXO blog if you want proof...the team rocked it this month!
Here's what I came up with:


So...inspired? Use the sketch, don't use the sketch...just show us your Facebook inspired pages! Head over here to check the rest of the team's work, and hope to see you play along!!
xoxo
Khristen
Subscribe to:
Posts (Atom)